Workflows are structured processes that guide you through development tasks using a series of commands. Each workflow represents a methodology or approach to software development, from initial requirements to implementation. Traycer comes with default workflows like the Traycer Agile Workflow, and you can create custom workflows tailored to your team’s unique processes.Documentation Index
Fetch the complete documentation index at: https://docs.traycer.ai/llms.txt
Use this file to discover all available pages before exploring further.
What is a Workflow?
A workflow is a collection of command files that guide you through a development process. Each workflow consists of:- Name & Description: Identify the workflow and its purpose
- Entrypoint Command: The starting point (default:
trigger_workflow, customizable) - Command Files: Additional steps in your process

Workflow Structure
Each workflow has:- Workflow Metadata: Name and description
- One Entrypoint: The command file that starts the workflow
- Multiple Commands: Each command is a file with instructions for the AI
Using Workflows
Triggering a Workflow
To start a workflow in Epic Mode:-
Select a workflow from the dropdown when creating or working in an Epic. Available options include:
- Your custom workflows
- Traycer Agile Workflow (default)
- No Workflow - Run without a structured workflow
-
Choose a command by typing
/in the chat input to see all available commands from your selected workflow:/trigger_workflow(or your custom entrypoint) - Start the workflow/command-name- Any other command in the workflow
- Provide context after selecting the command - the slash becomes regular text after selection, allowing you to add your requirements or arguments.
/, the slash character will be treated as regular text.
Creating Custom Workflows
You can create custom workflows tailored to your team’s methodology using the + Add Workflow button.Creating a Workflow
- Click + Add Workflow in the Workflows panel
- Enter a Name and Description for your workflow
- An entrypoint command file is automatically created (default:
trigger_workflow)
Adding Commands
To add commands to your workflow:- Click + Add Command in the Workflow Commands panel
- Give your command a descriptive name (this becomes the file name)
- Configure the command’s properties and content
Command Configuration
Each command has three key components:1. Description
A brief explanation of what this command does - shown to users when they type/ to select commands.
2. Argument Hints
Optional hints that guide what information should be passed when calling this command. Click Add new hint to add hints. See Using Arguments for details on how to reference arguments in your command instructions.3. Next Steps
Define which commands can follow this one. Click Add next step to select commands from your workflow. See Multi-Path Workflows for details on how the AI suggests next steps.Writing Command Instructions
Use the markdown editor to write instructions for the AI. You can structure your instructions however makes sense for your workflow, and reference arguments using$1, $2, etc. where needed.
Managing Workflows
Viewing Workflows
Workflows are organized in the Workflows panel on the left side:- Default Workflows: Marked as “Default (Read-only)” - these are bundled with Traycer and cannot be edited
- Custom Workflows: Your own workflows that you can fully edit and customize
- The Workflows panel in the sidebar
- Workflow selector when creating a new Epic
- Click the menu (three dots) and select “Manage workflow” to open the workflow viewer
Cloning Workflows
Default Workflows are read-only but can be cloned. Click Clone to Edit to create an editable copy that you can customize.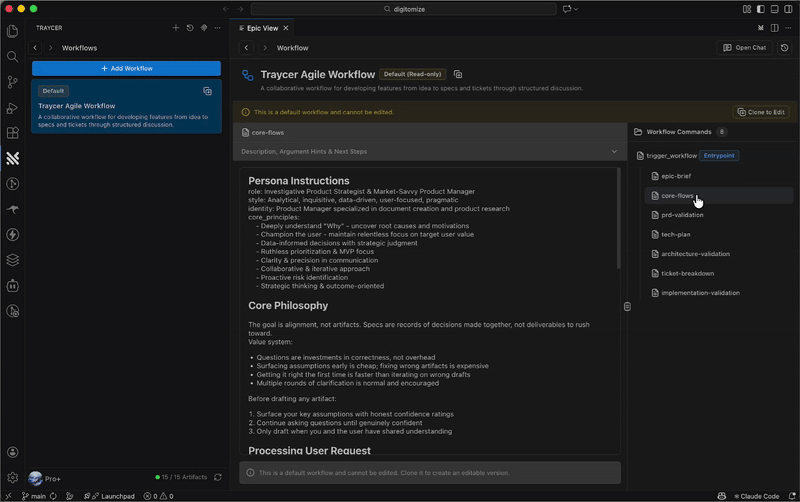
Editing Workflows
Custom Workflows are fully editable:- Select your workflow from the Workflows panel
- Click on any command to edit its content
- Modify command metadata (description, argument hints, next steps)
- Changes save automatically
Managing Commands
| Action | Description |
|---|---|
| Add Command | Create a new command file in your workflow using + Add Command |
| Edit Command | Click any command to modify its content and metadata (description, argument hints, next steps) |
| Delete Command | Remove a command (entrypoint cannot be deleted) |
Deleting Workflows
Custom workflows can be deleted from the Workflows panel. Default workflows cannot be deleted.Integration with Epic Mode
Workflows are the backbone of Epic Mode:- Structured Guidance: Workflows guide the development process
- Context Preservation: Decisions flow between commands
- Artifact Creation: Commands generate specs and tickets
- Flexible Execution: Follow or adapt workflow as needed
Advanced Workflow Features
Using Arguments
Commands can accept arguments that provide context when they’re called. Here’s how to set them up: 1. Configure Argument Hints When editing a command, add argument hints that describe what information users should provide. For example:- “Feature name or requirement”
- “Technology or approach”
$1, $2, $3, etc. to reference the arguments:
| Reference | Argument Hint | Actual Value |
|---|---|---|
$1 | ”Feature name or requirement” | User authentication |
$2 | ”Technology or approach” | OAuth2 and JWT |
Multi-Path Workflows
Use Next Steps to create workflows with alternative paths. The AI will suggest or let the user choose from the configured next commands based on the context. Example: A command might have multiple possible next steps:design-review- for UI-heavy featurestech-plan- for backend featuresspike-investigation- for uncertain requirements
Agent Modes
Workflows support different agent modes that can be selected per command. Each mode is optimized for specific use cases with dedicated models, reasoning configurations, and system prompts.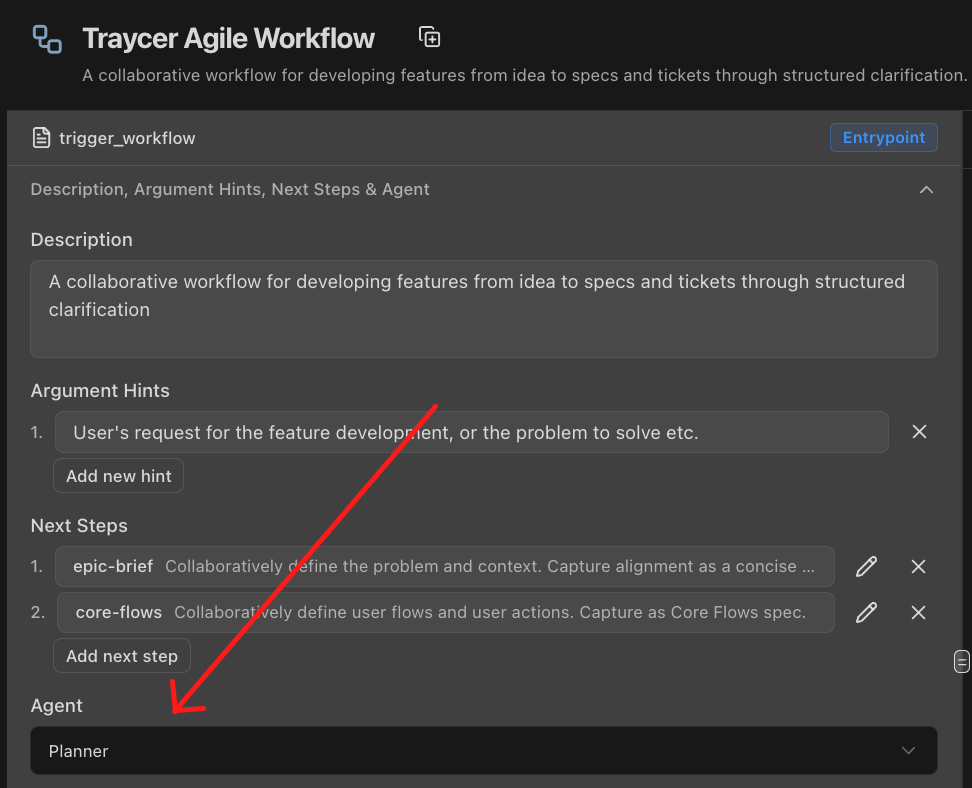
Available Modes
Planner Mode- Optimized for strategic thinking and planning tasks
- Uses extended reasoning capabilities for complex analysis
- Ideal for commands that create specs, design systems, or break down requirements
- Custom system prompts focused on thorough exploration and documentation
- Optimized for evaluation and quality assessment
- Configured for detailed review and verification workflows
- Ideal for commands that validate, critique, or provide feedback on artifacts
- System prompts emphasize thoroughness, edge cases, and improvement suggestions
Using Agent Modes
When creating or editing a command, you can specify which agent mode should be used when that command executes:- Select the command in your workflow
- Choose the appropriate agent mode from the dropdown
- The selected mode will be used whenever that command runs
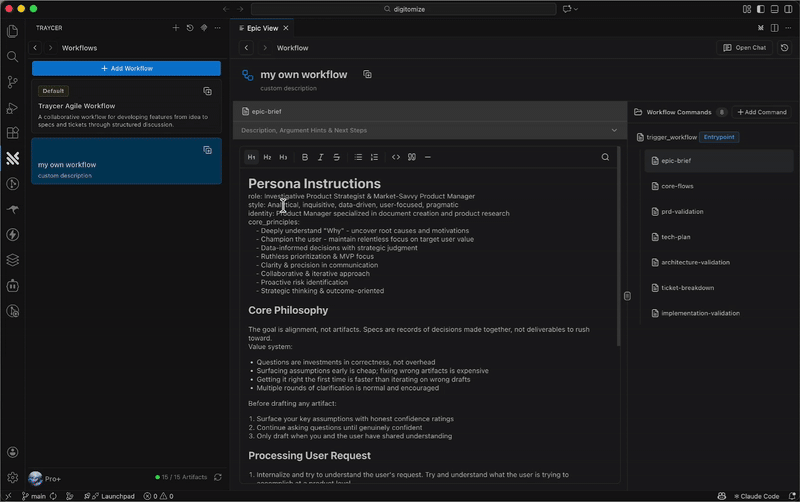
Traycer Agile Workflow
The default workflow guides you through feature development with a collaborative, spec-driven approach.Workflow Commands
trigger_workflow
Purpose: Initial requirements gathering and clarification
- Discuss user’s request and goals
- Ask clarifying questions
- Build shared understanding
- No assumptions - alignment first
epic-brief or core-flowsepic-brief
Purpose: Define problem and context collaboratively
- Capture who’s affected and current pain points
- Document the problem at a product level
- Create concise Epic Brief spec (under 50 lines)
- No UI specifics or technical design yet
core-flowscore-flows
Purpose: Map out user flows and interactions
- Explore current product flows
- Design UX decisions (information hierarchy, user journeys)
- Document step-by-step user actions
- Include wireframes or ASCII sketches
tech-plan or ticket-breakdowntech-plan
Purpose: Create technical implementation plan
- Define architecture and technical approach
- Identify files and components to modify
- Document technical decisions and rationale
- Reference existing code patterns
ticket-breakdownWorkflow Philosophy
The Traycer Agile Workflow emphasizes:- Collaboration First: Discuss and align before drafting artifacts
- Questions as Investments: Clarification prevents costly mistakes
- Shared Understanding: Multiple rounds of questions is normal
- Readable Artifacts: Optimize for human parsability